How To Draw Relay Logic Diagram
In previous chapter Relay Logic Circuit (RLC) we discussed about relay logic elements which are used in relay logic. Here I am telling to you How to create Relay Logic Circuit .
Before creating relay logic, following point should be in mind :-
1-You should know very well about operation's sequence of machine and circuit.
2-All spares (Relay, timer, switch etc) should be available.
3- Write sequence of operational steps in table form or flow control chart.
With help of following example we can easily understand relay logic. Now here we take one example for Relay logic:
Example:- One relay should be hold using one push button.
Solution:- This is basic example of relay logic, first we create step for this circuit.
Step 1:- When we press push button, relay should be on, It means we use NO push button because when we press this switch supply goes forward.
Step 2:- When supply comes to relay coil, relay should be ON. Here relay is 24 V DC operated. These two step we see in following picture:-

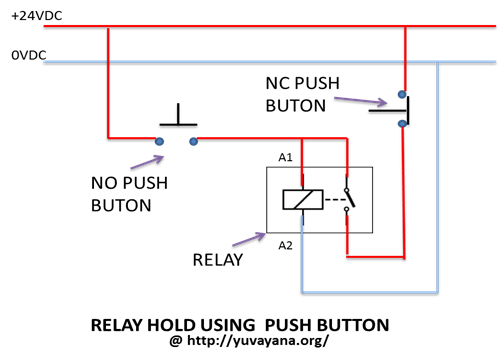
We connect relay and push button as per figure. When we press push button, supply goes to relay A1 point and relay gets ON and its contact changes, but when we release push button supply cutoffs and relay gets off. But relay not do not fall in hold. So here we think what we shall do for relay to hold. Now we use NO contact of relay for hold. How we use this contact see in figure:-

We connect +24VDC to COM point of relay and NO point to A1 Point of relay. When we press Push button supply goes to relay, Relay turned ON and contact changes NO point became NC point. Now +24VDC supply direct connect to A1 and relay turned ON. If we release Push button supply cuts from the push button but the supply is permanently coming from NO point and relay permanently ON or on hold.
Now we want to OFF this relay, how we OFF this relay? Listen! On above example supply permanent coming from NO point that supply do continue ON Relay. If we disconnect this supply using any element or device relay will be OFF. How? Here we use NC push button to disconnect the supply.

Using this figure you can easily understand this Example, Now you can do Online practical own self. Now we make line diagram of above example.

I think you easily understood above example. Now we give you twist with next example:-
Example-2:- We have two start push button and one stop push button, and two lamps (+24VDC). When we pressed push button-1(P1), Lamp-1(L1) should be permanent ON and Lamp-2(L2) OFF. If we press push button-2(P2), lamp-2(L2) permanent ON and Lamp-1(L1) OFF, that cycle is running but we press stop push button(P3) Cycle stop.

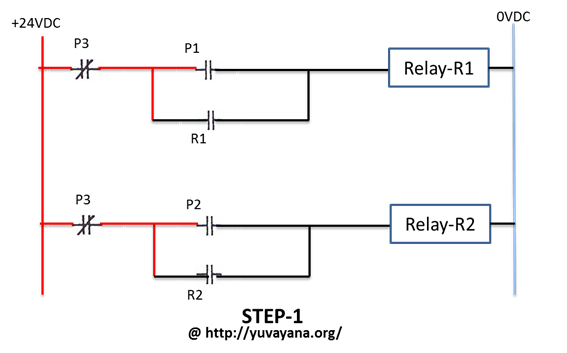
SOLUTION:- First we make flow chart of this circuit. As per following image , P1 push button work as Stop button for Lamp-2 and P2 push button work as stop button for lamp-1. Now it's is very easy to make line diagram.

STEP-1 :-First we hold relay individually with push button, it means using Push button-1, we hold relay-1 and using push button-2, we hold relay-2. Relay-1 uses for Lamp-1 and Relay-2 uses for Lamp-2.

STEP-2:- Now we interlock both relay, if push button-2 NC point connect in series with NO point (holding point) of relay-1 and Push button-1 NC point connect with NO point(holding point) of relay-2 as per following line diagram.

Step-3:- In this step we connect lamp with relay. Relay NO point we use for lamp. 0VDC connect direct with lamp and +24VDC goes through Relay. Both lamps connect as per following image:-

Example-3:- Lamp should be ON after 5minute, if we press Push button
Solution:- In this circuit we used ON delay Timer. Delay is 5 minute. For this circuit we use one relay, one ON delay timer, two push buttons and one lamp (+24VDC operated).
Following line diagram for this example:-

This circuit depends on timer setting, if you use multifunction timer. Otherwise you use ON delay timer.
Example-4:- Make STAR-DELTA starter control circuit diagram.
Solution:- See our topic on this site " How to troubleshoot three phase induction motor ".
Do it Yourself:
Now I am giving to you your PRACTICE WORK. After making your solution, Send us on Info@yuvayana.org and If you have any problem with any relay circuit contact us .
Q1- Make Conveyor forward reverse circuit. First conveyor goes to forward and after activating fwd limit switch, conveyor should be reverse. And after activate reverse limit switch conveyor should be stop.

Q2- Make Conveyor forward reverse circuit continuous. First conveyor goes to forward and after activating fwd limit switch, conveyor should be reverse. And after activate reverse limit switch conveyor should be forward. This cycle is continuing running whether we press stop push button.
Q3- Blinking light circuit. After pressing push button, light on for 5 sec and light OFF for 5 sec. To understand this example see timing diagram of circuit.

Q4- Blinking light circuit for limited time. After pressing push button, light on for 12 sec and light OFF for 12 sec, this blinking is working for 1MINUTE. To understand this example see timing diagram of circuit.

Q5:- Filling tank in auto mode. When tank is full, Pump should be OFF, If water level goes to low, pump should be ON.( Leveling sensor we use for water level. It's have NO and NC point.)

Remarks:– If you want to create any other RLC circuit and you are facing problem with circuit. Kindly contact us, we will help you whatever we can.
Also Check: Transistor as a switch theory
Source: https://er.yuvayana.org/how-to-create-relay-logic-circuit-with-examples/
Posted by: nicolehoce1951aed.blogspot.com
Posting Komentar untuk "How To Draw Relay Logic Diagram"